

Intro to Activity and its XML layout relationship.
So if you generate/already have an Activity (consider MainActivity) you will see a activity_main.xml which is the layout file for the activity.
So what is the concept of Activity?
Every page you see in Android App is Activity? Maybe. Maybe Not. This is because an app can have many activities which we will see. But every page we see is not always an activity. It can be a fragment too. But this does not mean that every page you can see cannot be Activity Page. Some developer can make all his pages in his app Activities. While some developer can make one Activity only and following pages can be the Fragment of that Activity.
But let us focus on Activity and Layout for now.
Activity Concept
Imagine and App as a NOTEBOOK

XML = Extended Markup Language. HTML = Hyper Text Markup Language.
- Your app is a notebook.
- A
single pagein the notebook is an Activity. - The more activity you create, the app has more pages to show.
- You can design, draw, write in a page which is equivalent to designing a XML file that will be unique for its respective activity.
How to create new activity?
- Right click on your project root package
com.kushagra.myappinsideappfolder then choose New>Activity>Empty Activity. - Create a new Activity with a new name example: 'HeroActivity'
- This will also automatically give you
activity_heroxml file.
Exploring the xml of an activity.
- Open the XML of the activity, you can do this by Ctrl+Click in you Activity Java file here:
setContentView(R.layout.activity_hero); - Or you can search the file using quick search (Double shift)
- Or you can manually navigate the project files. All the XML layout files are present inside
res > layout >folder in your left navigation section. - You will see some default boiler plate code in that layout xml page.
Editing the xml
- Switch to
SplitMode for xml file which you can find on the top-right side of the IDE [Code | Split | Design] - After that you will see your xml code on the left and mobile view on the left.
- Click Once on the mobile view page and press
Bbutton until you see a white mobile page. ( Do this to switch design surface). - Your xml will initially contain a parent TAG as
ConstraintLayoutwith aTextViewinside it. - Delete the
TextViewtag inside theConstraintLayoutso you will now have something like below.
<?xml version="1.0" encoding="utf-8"?>
<androidx.constraintlayout.widget.ConstraintLayout
xmlns:android="http://schemas.android.com/apk/res/android"
xmlns:app="http://schemas.android.com/apk/res-auto"
xmlns:tools="http://schemas.android.com/tools"
android:layout_width="match_parent"
android:layout_height="match_parent"
tools:context=".HeroActivity">


</androidx.constraintlayout.widget.ConstraintLayout>
- Change the xml parent tag from
androidx.constraintlayout.widget.ConstraintLayouttoLinearLayoutwhich will look like
<?xml version="1.0" encoding="utf-8"?>
<LinearLayout xmlns:android="http://schemas.android.com/apk/res/android"
xmlns:app="http://schemas.android.com/apk/res-auto"
xmlns:tools="http://schemas.android.com/tools"
android:layout_width="match_parent"
android:layout_height="match_parent"
tools:context=".HeroActivity">


</LinearLayout>
- Try building this application which will not show you any significant changes
Understanding ViewGroup
A ViewGroup is a special view that can contain other views (called children.) The view group is the base class for layouts and views containers.The ViewGroup classes are extended from Views. They are used as containers on the android app screen
- Basically ViewGroup will hold Views or ViewGroup (which can be nested) which is done to build our layout in xml files.
Types of ViewGroup
- LinearLayout
- ConstraintLayout
- RelativeLayout
- FrameLayout
CoordinatorLayout etc.
LinearLayout and ConstraintLayout are the basic ViewGroup that we will be practicing in the course.
Orientation in LinearLayout
<?xml version="1.0" encoding="utf-8"?>
<LinearLayout xmlns:android="http://schemas.android.com/apk/res/android"
    android:layout_width="match_parent"
    android:layout_height="match_parent">

    <Button
        android:layout_width="wrap_content"
        android:layout_height="wrap_content"
        android:background="@android:color/holo_green_light"
        android:text="Button 1" />

    <Button
        android:layout_width="wrap_content"
        android:layout_height="wrap_content"
        android:text="Button 2" />

    <Button
        android:layout_width="wrap_content"
        android:layout_height="wrap_content"
        android:background="@android:color/holo_purple"
        android:text="Button 1" />

</LinearLayout>
By default the orientation is horizontal and the gravity is left aligned.
if you add android:orientation="vertical" to the LinearLayout you will see change in the how the buttons will be arranged.
<?xml version="1.0" encoding="utf-8"?>
<LinearLayout xmlns:android="http://schemas.android.com/apk/res/android"
    android:layout_width="match_parent"
    android:orientation="vertical"
    android:layout_height="match_parent">

    <Button
        android:layout_width="wrap_content"
        android:layout_height="wrap_content"
        android:background="@android:color/holo_green_light"
        android:text="Button 1" />

    <Button
        android:layout_width="wrap_content"
        android:layout_height="wrap_content"
        android:text="Button 2" />

    <Button
        android:layout_width="wrap_content"
        android:layout_height="wrap_content"
        android:background="@android:color/holo_purple"
        android:text="Button 1" />

</LinearLayout>
Weights
LinearLayout allows us to set weights on the child views. This will signify the share of width or height that particular view uses from its parent view.
We have to specify android:weightSum to the LinearLayout and android:layout_weight attribute in the child view.
<?xml version="1.0" encoding="utf-8"?>
<LinearLayout xmlns:android="http://schemas.android.com/apk/res/android"
    android:layout_width="match_parent"
    android:orientation="horizontal"
    android:weightSum="3"
    android:layout_height="match_parent">

    <Button
        android:layout_weight="1"
        android:layout_width="0dp"
        android:layout_height="wrap_content"
        android:background="@android:color/holo_green_light"
        android:text="Button 1" />

    <Button
        android:layout_weight="1"
        android:layout_width="0dp"
        android:layout_height="wrap_content"
        android:text="Button 2" />

    <Button
        android:layout_weight="1"
        android:layout_width="0dp"
        android:layout_height="wrap_content"
        android:text="Button 3" />

</LinearLayout>
The
layout_weightis set on the child views. We have to assign the width as0dpso that the widths would be automatically calculated using the Layout Weights in LinearLayout.Similarly, if the orientation is vertical and Layout weights are specified, we have to specify the
layout_heightas 0dp. It will be calculated automatically from thelayout_weightattribute.
Nesting LinearLayouts
<?xml version="1.0" encoding="utf-8"?>
<LinearLayout xmlns:android="http://schemas.android.com/apk/res/android"
    android:layout_width="match_parent"
    android:layout_height="match_parent"
    android:orientation="vertical"
    android:weightSum="3">


    <LinearLayout
        android:layout_width="match_parent"
        android:layout_height="0dp"
        android:layout_weight="1"
        android:orientation="vertical"
        android:weightSum="0.8">

        <ImageView
            android:layout_width="match_parent"
            android:layout_height="0dp"
            android:layout_weight="0.4"
            android:src="@mipmap/ic_launcher" />

        <ImageView
            android:layout_width="match_parent"
            android:layout_height="0dp"
            android:layout_weight="0.2"
            android:src="@mipmap/ic_launcher" />

        <ImageView
            android:layout_width="match_parent"
            android:layout_height="0dp"
            android:layout_weight="0.2"
            android:src="@mipmap/ic_launcher" />

    </LinearLayout>


    <LinearLayout
        android:layout_width="match_parent"
        android:layout_height="0dp"
        android:layout_weight="1.2"
        android:gravity="center"
        android:weightSum="1.5">

        <Button
            android:layout_width="0dp"
            android:layout_height="wrap_content"
            android:layout_gravity="top"
            android:layout_weight="0.5"
            android:background="@android:color/holo_green_light"
            android:text="Button 1" />

        <Button
            android:layout_width="0dp"
            android:layout_height="wrap_content"
            android:layout_weight="0.6"
            android:text="Button 2" />

        <Button
            android:layout_width="0dp"
            android:layout_height="wrap_content"
            android:layout_gravity="bottom|right"
            android:layout_weight="0.4"
            android:text="Button 3" />


    </LinearLayout>

    <LinearLayout
        android:layout_width="match_parent"
        android:layout_height="0dp"
        android:layout_weight="1"
        android:gravity="center"
        android:weightSum="1.5">

        <TextView
            android:layout_width="0dp"
            android:layout_height="wrap_content"
            android:layout_weight="0.4"
            android:background="@android:color/holo_green_light"
            android:text="Androidly 1" />

        <TextView
            android:layout_width="0dp"
            android:layout_height="wrap_content"
            android:layout_weight="0.7"
            android:background="@android:color/black"
            android:gravity="center"
            android:text="Androidly 2"
            android:textColor="@android:color/white" />

        <TextView
            android:layout_width="0dp"
            android:layout_height="wrap_content"
            android:layout_weight="0.4"
            android:background="@android:color/holo_purple"
            android:text="Androidly 3"
            android:textColor="@android:color/white" />


    </LinearLayout>

</LinearLayout>
The code above will show how to use nested view and ViewGroup for LinearLayouts.
We’ve set layout weights on each of the child LinearLayouts. The gravity attribute is used to set the gravity of all the child’s views. The
layout_gravityis used to set the gravity of a ChildView relative to the layout.
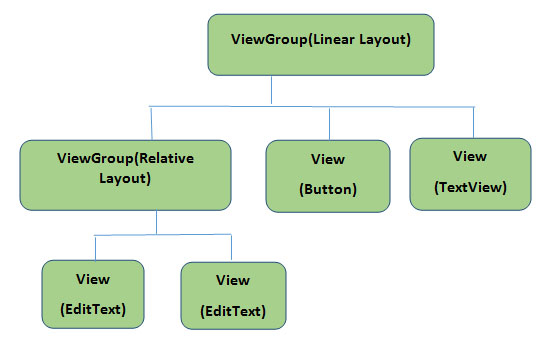
Assignment 02
Try to make the following XML layout using:
- ViewGroup
- LinearLayout -View
- EditText
- Button
- TextView
Please share your github link after completing or trying this task!